How to Install a Stair Runner
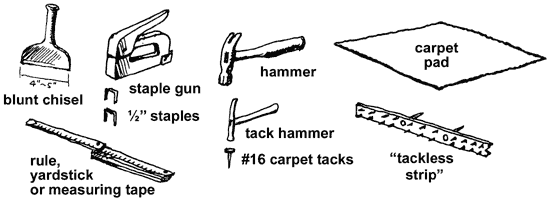
Tools and materials
We're going to do a typical Oriental runner installation on a stairway. We'll be using these tools and materials:
The installation
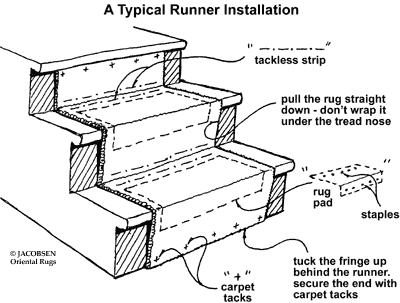
1. Cut pieces of tackless strip (usually available at Home Depot or Lowe's; comes in 4' lengths) about 1 1/2" narrower than the width of the runner. You need one piece at the back of each tread and one piece at the bottom of each riser. Mark the center of the pieces of tackless, and mark the center of the treads where the treads and risers meet at the back of the treads.
2. Attach one tackless strip at the back of the first tread. The tackless should be about 1" out from the corner formed by the back of the tread and the bottom of the riser for thinner rugs, and as much as 2" out from the corner for very thick runners. Adjust as necessary. The strip should be centered on the mark you made in Step 1. The tacks in the strip should face back toward the riser.
3. Attach one tackless strip at the bottom of the first riser. The tackless should be about 1" up from the corner formed by the back of the tread and the bottom of the riser for thinner rugs, and as much as 2" up from the corner for very thick runners. Adjust as necessary. The strip should be centered on the mark you made in Step 1. The tacks in the strip should face down toward the tread. Repeat Steps 2 and 3 for all the treads and risers to be covered by the runner.
4. Cut a piece of carpet pad for each tread. The pieces of pad should be the same width as the tackless strip, and deep enough to butt against the tackless strip at the back of the tread and wrap down over the edge or "nose" of the tread. The pad should end short of the tackless on riser below the tread.
5. Attach a piece of carpet pad to each tread. Center the pad and butt it against the tackless at the back of the tread. Fasten with a staple at the back corners and every 6" paralleling the tackless. Wrap the pad down over the nose of the tread and staple the corners and every 6" to the riser. Repeat for all the treads.
6. Rub the pile of your runner with the palm of your hand. Notice that the pile lays smoothly in one direction. Face the rug with the pile laying toward you. You will install the runner with the far end at the top of the stairs. By doing this, you arrange for the pile to face down on the risers. The pile catches less dirt this way, and the runner will last longer and look better.
7. Start the rug at the top of the stairs. If beginning under the nose of the upper landing, fold the fringe to the back of the rug, center the rug at the top of the riser, snug the end up tight under the nose, and fasten the top edge to the riser with a carpet tack at each corner and every 4" across the end. If starting the rug on the upper landing, cut a piece of carpet pad long enough to sit under the rug and extend down over the nose of the landing onto the riser below. Staple the pad in place on the landing and on the riser. Fasten the rug over the pad with a carpet tack at each corner and a tack every 4" across the end and down the edges on the landing. The attachment of the end of the runner on the landing must be good and secure to be safe.
8. Smooth the rug down to the bottom of the riser and push it back tight into riser-tread corner so it is gripped by the tackless strips in the corner. The runner should flow smoothly to the bottom of the riser. Do not tuck it back under the nose of the tread and tight to the riser. Be sure the runner is straight on the stairs. Wrap the runner out and over the next tread and check that length used to cover the riser and tread combination is what you expected. If the rug is running "long", you can take up a bit of extra length by re-setting the rug in the tackless corner so it is a little looser (but not much!) on the riser. If the rug is running "short", you can pull it more tightly down the riser, or push it not-quite-so-far into the tackless corner. When happy with the arrangement, pound the runner into the corner with the blunt chisel (you can also use the edge of a narrow piece of plywood, or any other tool you have that will let you tamp the rug into the tackless corner without cutting or piercing the face of the rug). The runner should be solid in the corner, with the tacks of the tackless strips gripping it across its full width.
9. Continue down the stairs, doing each riser-tread combination in turn.
10. Finish the installation at the bottom. If the rug finishes on the bottom tread with the fringe hanging down over the riser, shorten the last carpet pad so it doesn't show on the riser. Secure the end of the runner with carpet tacks as you did the top. If the runner finishes at the bottom of the bottom riser, tuck the fringe behind and secure with a row of tacks across the end of the rug at the bottom of the riser. If the runner ran longer than you thought, you can even fold a few inches of pile to the back and secure the rug at the bottom of the riser with 1 1/2" or 2" finishing nails. If the runner is to run out a bit onto the floor at the foot of the stairs, put a piece of carpet pad under it, and secure the end and edges of the rug with a few carpet tacks.